
Revitalizing Your Space: How a DIY Mural Transforms Your Bathroom | prediksi sdy 17 februari 2023, singapore pools prize, real online casino, 777 games casino, rtp wingbola, slot633
Discover how a simple DIY mural can breathe new life into your bathroom. Get inspired for your next minimalist home project today! Topics: prediksi sdy 17 februari 2023, singapore pools prize, real online casino, 777 games casino, rtp wingbola.

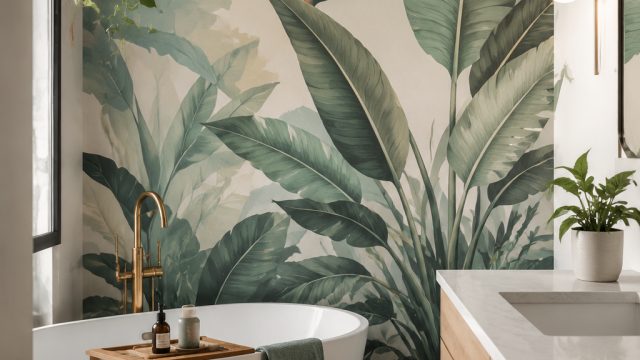
Are you looking to refresh your bathroom without spending a fortune? A DIY mural might be just what you need! With a blend of creativity and practical skills, you can dramatically change the look of your space while embracing a minimalist aesthetic. In this article, we’ll explore the transformative power of wall murals and how they can revitalise your bathroom with ease.
The Current Trend: DIY Home Improvements
As many homeowners face the reality of budget constraints, the DIY movement has gained momentum. People are increasingly seeking ways to renovate their homes using skills they can develop themselves, and bathrooms are often at the forefront of these projects. A fresh coat of paint, complemented by clever artwork, can renew the atmosphere of any bathroom.
Why Opt for a DIY Mural?
- Affordability: A DIY mural can be significantly cheaper than hiring a professional artist.
- Personal Touch: This is an opportunity to express your style and preferences.
- Creative Outlet: Engaging in a DIY project can be rewarding and therapeutic.
The Considerations Before You Start
Before embarking on your mural journey, there are several factors to consider, ensuring a successful outcome that matches your vision.
Space and Design
Evaluate the space you want to decorate. Here are key points to keep in mind:
- Size: A larger wall can accommodate bigger designs, while smaller walls might benefit from simpler patterns.
- Color Scheme: Choose colors that complement your existing decor. Neutral tones often work best in minimalist designs.
- Theme: Decide whether you want something playful, like geometric shapes, or something more serene and calming.
Materials and Tools Needed
Gathering the right materials is essential for a polished finish.
- Paint: Select high-quality paint that suits your bathroom's humidity levels.
- Brushes and Rollers: Invest in a variety of sizes for different detailing.
- Stencils: If you're not comfortable freehanding your design, stencils can provide a clean and professional look.
- Protective Gear: Wear gloves and goggles to protect yourself while painting.
Steps to Create Your Bathroom Mural
Follow these steps to create a stunning mural in your bathroom:
Step 1: Prepare the Area
Clear the bathroom of any items that may obstruct your work. Ensure surfaces are clean, dry, and primed for painting.
Step 2: Sketch Your Design
Using a pencil, lightly sketch your design on the wall. This will help you visualize how your final mural will look.
Step 3: Paint the Base Layer
Start by painting the base color of your mural. Allow it to dry completely before proceeding.
Step 4: Add Details
Using smaller brushes, begin adding details to your mural. Focus on one section at a time for accuracy.
Step 5: Finishing Touches
Once your design is complete, add a protective sealer to enhance durability, especially in a moisture-rich environment.
Conclusion: Embrace the Transformation
With just a bit of time and effort, a DIY mural can provide a fresh perspective to your bathroom, making it a personal sanctuary. This trend aligns perfectly with the minimalist lifestyle, emphasizing simplicity and thoughtful design. As you embrace your creativity, you’ll not only enhance your living space but also enjoy the satisfaction of having crafted something truly unique. So, gather your materials and get started on your project today!
